Building Anaconda Navigator applications#
In this tutorial, you will learn how to add a tile to Anaconda Navigator that launches your custom application.
Using the JupyterLab feedstock as a base, you’ll make modifications to files in the build recipe to declare the package as an application for Navigator, then rebuild it and upload it to an Anaconda.org channel. We’ll then add the channel in Navigator, causing the application to appear as a tile on the Home page.
Who is this for?#
This tutorial is for users who want to generate an Anaconda Navigator app conda package from a given recipe. Prior knowledge of conda-build or conda recipes is recommended.
Prerequisites#
Note
Any application you intend to launch from Anaconda Navigator should include a Graphical User Interface (GUI) component. Not all conda packages have graphical interfaces.
If you installed Miniconda, you also need to install the
conda-build,anaconda-client, andanaconda-navigatorpackages. Open an Anaconda Prompt (Terminal for macOS/Linux users) and run the following commands:# Ensure conda is up to date conda update --name base conda # Install conda-build conda install --name base conda-build anaconda-client anaconda-navigator
If necessary, Create an account on Anaconda.org.
Note
Your Anaconda.org username is the same as your Anaconda.org channel name.
Using a recipe#
Make a new directory called myapp and then change to the new directory:
mkdir myapp
cd myapp
Create the recipe by opening a text file and naming it
meta.yaml.For this tutorial, we will use the jupyterlab recipe yaml from the jupyterlab feedstock as a base.
Note
Because JupyterLab is already an application in Navigator, you must change the name: parameter in the example jupyterlab meta.yaml to make sure that the app appears properly in Navigator.
package:
  name: my-test-app
App parameter in meta.yaml#
The app: parameter in the meta.yaml file declares a conda package to be an app. The app parameter can contain four keys: entry, summary, icon, and type.
app:
  entry: jupyter lab
  icon: icon.png
  summary: JupyterLab {{ version }}
  type: desk
entry:The command required to run the package
icon:(Optional) The path to an image you want to appear on your app’s tile in Navigator.
summary:A short description of the app.
type:The application type, such as
deskfor desktop application orwebfor a web application.
Build#
Now that you have the conda-build recipe ready, you can use the conda-build tool to create the package.
Note
You must build and upload your app separately on Windows, macOS, and Linux machines in order for the package to be available on all platforms.
Navigate to your
myappdirectory by running the following command:#Replace <PATH-TO-DIRECTORY> with the file path to your my app folder cd <PATH-TO-DIRECTORY>/myapp
Build your application by running the following command:
conda build .
When conda-build is finished, it displays the exact path and filename of the conda package. See the Troubleshooting section if the conda-build command fails.
Note
The path and filename will vary depending on your installation and operating system. For example:
C:\Users\<USERNAME>\miniconda\conda-bld\win-64\my-test-app-1.2.4-py38_0.tar.bz2
/Users/<USERNAME>/anaconda3/conda-bld/osx-64/my-test-app-1.2.4-py38_0.tar.bz2
/home/username/miniconda/conda-bld/linux-64/my-test-app-1.2.4-py38_0.tar.bz2
Save the path and filename information for the upload step.
Upload to Anaconda.org#
Now you can upload the new local packages to Anaconda.org.
First, log in to Anaconda.org from your terminal by running the following command:
anaconda login
Provide your Anaconda.org username and password. If the login is successful, you will see output similar to the following:
Using Anaconda.org api site https://api.anaconda.org

Username: jsmith
jsmith's Password:
login successful
Caution
The following step must be done in the
baseconda environment. To return to your base environment, run the following command:conda activate base
Now that you are logged into your channel, you can upload the JupyterLab package. Choose a command that works for your operating system:
Caution
Change your username, path, and filename to the exact username, path, and filename you saved when you built the application. These will vary depending on your installation and operating system.
anaconda upload C:\Users\<USERNAME>\miniconda\conda-bld\win-64\my-test-app-1.2.4-py38_0.tar.bz2
anaconda upload /Users/<USERNAME>/miniconda/conda-bld/osx-64/my-test-app-1.2.4-py38_0.tar.bz2
For more information about Anaconda.org, see the Anaconda.org documentation.
Configure Anaconda Navigator#
Now that the JupyterLab package has been uploaded to your Anaconda.org channel, you can add the channel to Anaconda Navigator.
Open Anaconda Navigator.
From the Start menu, search for “Anaconda Navigator” and click to open.
Open Launchpad, then click the Anaconda-Navigator icon.
Open a terminal window.
Open Navigator by using the following command:
anaconda-navigator
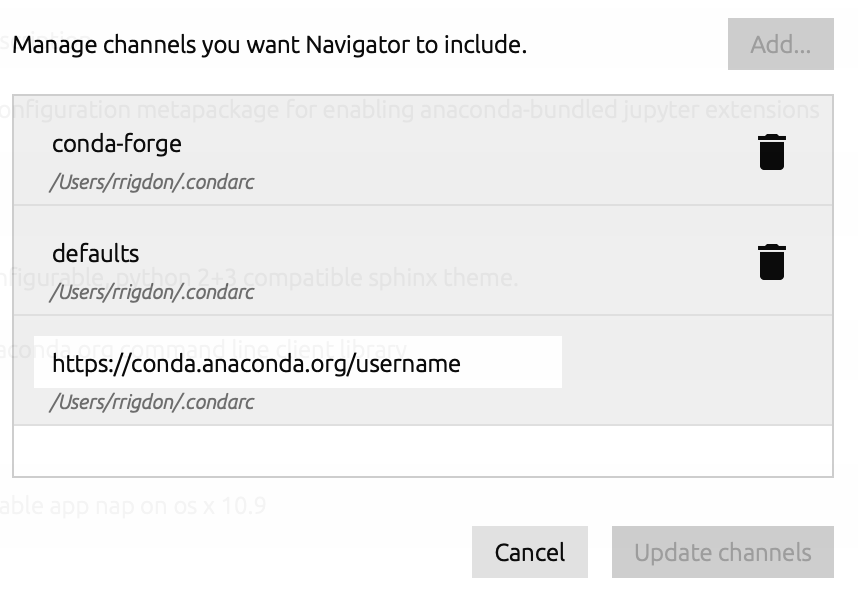
To add your channel, click Channels, then Add. Enter the URL to your Anaconda.org channel: https://conda.anaconda.org/<CHANNEL>, replacing <CHANNEL> with your Anaconda.org username.
Press Enter (Windows)/Return (Mac) and click Update Channels.
Close and restart Anaconda Navigator. Your app will be displayed on the Home page.
Troubleshooting#
My app isn’t appearing on the Home page#
Check that the conda package has been uploaded to your Anaconda.org channel.
Check that your channel has been added to the Channels list.
Remove the
.anaconda/navigatorfolder from your home directory to reset Navigator’s configuration information, then restart Navigator.
My app isn’t launching#
If the application does not launch after installation, confirm that it works via the command line by running the following command:
conda run jupyter lab
Note
If you are not using the example feedstock, the command after
runwill be theentry:command you have designated.If JupyterLab starts correctly with conda, remove the
.anaconda/navigatorfolder from your home directory to reset the Navigator configuration information and enable the app to launch correctly from the Navigator application. Then, restart Navigator.
Additional Information#
For more information about adding Start Menu entries in Windows, see the menuinst documentation.
